Setup Go Dev environment on macOS
Prerequisites
This setup assumes using macOS. Tested for Mojave Version 10.14.3
We will use brew to install software. Follow instructions on Homebrew main page to install it if it is not installed yet.
Install Go
Homebrew provides two benefits comparing to official Go distribution package:
- Package includes scripts for uninstalling and simplify system clean up as described in this post
- Every Go version is installed into individual folder. That really helps if we switching between versions.
Run this command line to install Go:
brew install go
Go binary distribution is installed now. It can be tested by checking Go version:
go version
tip: Restart your terminal window
Create workspace
A workspace is a directory hierarchy with two directories at its root:
srccontains Go source filesbincontains executable commands.
The go tool builds and installs binaries to the bin directory.
Most Go programmers keep all their Go source code and dependencies in a single workspace.
tip: Default workspace location on macOS is
$HOME/go
Create workspace’s src and bin directories:
mkdir -p $(go env GOPATH)/src
mkdir -p $(go env GOPATH)/bin
Add the workspace’s bin subdirectory to your $PATH env variable. To keep $PATH updated after conole restart it has to be added to ~/.bash_profile file:
export PATH=$PATH:$(go env GOPATH)/bin
Restart console.
Install critical Go packages
At the moment of writing this post, Go Modules are not finally released. That is why we install Go dep dependency management tool. You may not need this step if you are using Go Modules.
brew install dep
Install Software
Install VS Code
Install your favorite Git client. I use SourceTree.
note: SourceTree Homebrew Formulae was not up to date when I checked it (2.7.6a vs 3.1.1) so it is better to use package from official site.
Configuration
VS Code Plugins
Install VS Code plugins:
VS Code Settings
Check VS Code Settings documentation to see how settings are edited. Merge setting below into your settings.json file:
{
    "files.autoSave": "afterDelay",
    "[go]": {
        "editor.formatOnSave": false,
    },
    "go.testOnSave": true,
    "go.coverOnSave": true,
    "go.testFlags":["-tags", "sql"],
    "go.coverageDecorator": {
        "type": "gutter",
        "coveredHighlightColor": "rgba(64,128,128,0.5)",
        "uncoveredHighlightColor": "rgba(128,64,64,0.25)",
        "coveredGutterStyle": "blockblue",
        "uncoveredGutterStyle": "slashyellow"
    }
}
Let me explain what every line means here and why it is configured this way.
tip: you can find
gosettings in settings menu if you expandExtensions->Go configurationsection.
VS Code settings explained:
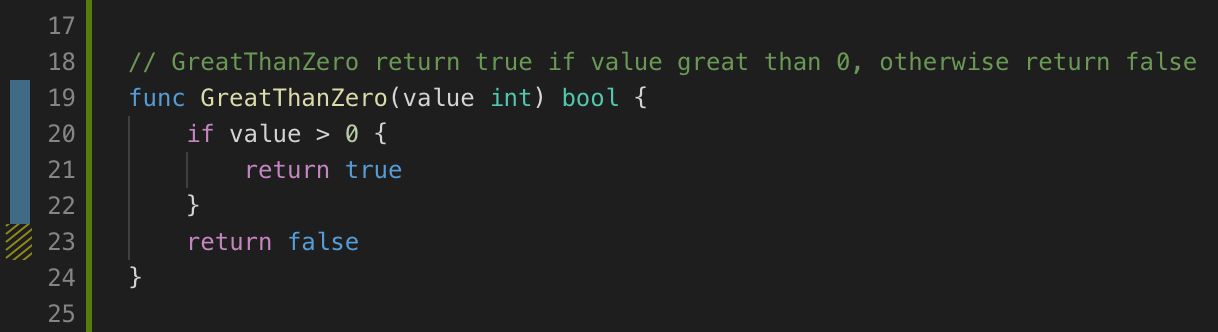
files.autoSavecontrols if editor automatically saves “dirty files”.afterDelaysaves file after short delay which is equal to 1s by default. This setting is important because many VS Code plugins uses file save event as a trigger. With this setting we control for example how often we run our unit tests. Enable it if you see the benefits to get test results and code coverage as fast as every second.editor.formatOnSaveruns Go formatter (goreturnsby default) for just saved files. Should be disabled iffiles.autoSaveenabled to avoid not expected code modifications while we are in the middle of writing code. You still can use VS Code key shortcut Shift + Option + F to format code on demand.go.testOnSaveandgo.coverOnSavetriggers tests execution and renders tests coverage. These settings are essential part of TDD setup and work really good withfiles.autoSave.go.testFlags- flags to pass togo test. With these flags we can control what types of tests to run. It is good practice to run only unit tests by default as other types of tests are more expensive or not always reliable. Although, with proper setup we can run something like local DB integration tests safely. It is possible to filter tests usinggo.testFlagsflag. Check another article in this blog that describes how to use flags for skipping tests.go.coverageDecorator- this option controls how code coverage is displayed. Use your creativity to configure it as you like it. Settings in sample above highlight covered lines with blue color and uncovered lines left with yellowish block:
That is it. You are all set.
Happy Coding!